I get asked frequently by people who evaluate Pentaho: How do I get started? Many people (tens of thousands on a monthly basis) download the Pre Configured application and immediately get a sense for the benefits of the Pentaho open source project.
What people almost always want to do next, is get started with their OWN data. You the reader of this blog might find a pre canned demo interesting, but you’ll want to reserve judgement on the leading open source BI Project until you’ve seen your own data flowing into beautiful PDFs/Excel/OLAP Pivot Tables. I totally understand…
This is a very SIMPLE, BASIC, LIGHTWEIGHT guide on how to get the downloadable DEMO connected to YOUR DATABASE and executing YOUR SQL Query using the lynchpin of the Pentaho platform, an Action Sequence (refer to this blog for more on what Action Sequences are).
Disclaimer: Pentaho has development tools that once installed makes the development of action sequences more productive then editing xml as below. In other words, this is just rough and dirty to get you going and connect… I highly suggest downloading the Development Workbench to actually build the Action Sequences.
Step 1:
Collect the following information for your database.
- Vendor (Oracle/MySQL) provided JDBC Jar file (classes12.zip, mysql-connector-java-3.1.12-bin.jar)
- JDBC Connection URL (jdbc:mysql://localhost/database)
- JDBC User Name (scott)
- JDBC Password (tiger)
- A SQL query that you are certain works in your database (select id, title from status)
This is the information needed for ANY Java Application to connect to a database, and is not really Pentaho specific.
Step 2:
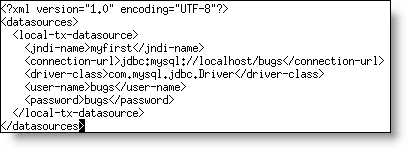
Create (using notepad or vi) a file named myfirst-ds.xml in $DEMO_BASE/jboss/server/default/deploy/
Put the following into that file to create a JNDI datasource with the JNDI-NAME “myfirst”

Note: You need to replace the above items with the corresponding JDBC information you collected in the first step.
Step 3:
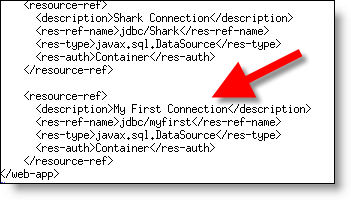
Edit (using notepad or vi) the file $DEMO_BASE/jboss/server/default/deploy/pentaho.war/WEB-INF/web.xml.
Add the following right below the Shark Connection entry

Step 4:
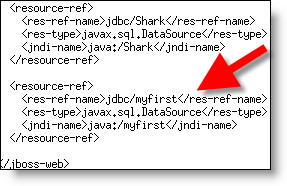
Edit (using notepad or vi) the file $DEMO_BASE/jboss/server/default/deploy/pentaho.war/WEB-INF/jboss-web.xml.
Add the following right below the Shark entry

Step 5:
Copy your Vendor provided jdbc driver library (classes12.zip) in the following directory:
$DEMO_BASE/jboss/server/default/lib
Congratulations, you’ve setup your JNDI datasource! Whew…. Almost there.
Step 6:
Let’s create your first action sequence!
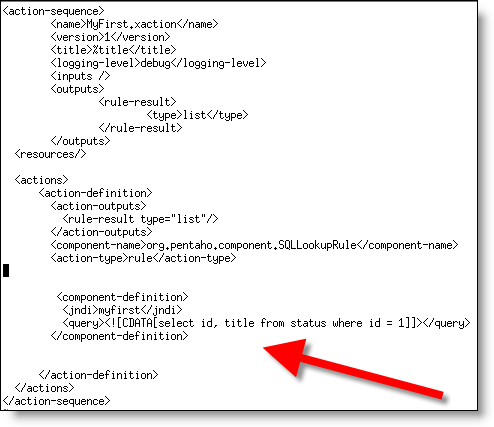
Create (using notepad or vi) a file named MyFirst.xaction in $DEMO_BASE/pentaho-solutions/samples/datasources

Make sure and replace the select I have above with a select statement that you KNOW works in your database.
Step 7:
Restart your server using the stop-pentaho/start-pentaho commands in $DEMO_BASE.
Step 8:
Open up Firefox (cough IE) and hit the following URL:
http://localhost:8080/pentaho/ViewAction?&solution=samples&path=datasources&action=MyFirst.xaction
You should see the basic output of the Action Sequence which, in this case, is the results of the SQL you provided.
| Action Successful
|
||
| id | title | |
|---|---|---|
| 1 | Open | |
That’s it! You’re connected to your own datasource and now you can start to explore the immense power of Action Sequences with your data… There are approximately 50 example .xactions in the demo so use them as a reference when trying to exploring the features of the platform. I HIGHLY SUGGEST downloading the workbench as well. It’s a visual environment for authoring .xaction files. Trust me, you’ll appreciate the GUI!